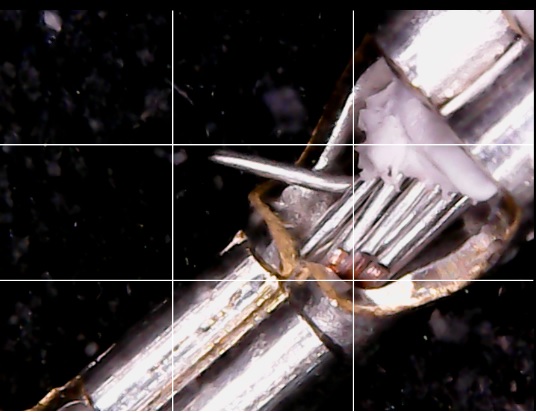
하네스를 생산현장에서 대량으로 생산되는 하네스 선 하나를 대상으로 확대가능한 웹캠으로 이지지를 촬영하여 윤곽선을 추출해 보자. 측정 가능한 자(ruler) 와 함께 이미지를 얻어낼 경우에는 추출된 윤곽선들간의 길이 측정이 가능하며 이로서 커넥터가 압착과정에 의해 제대로 만들어졌는지 품질 확인이 가능하다.
OpenCV, imutils, matplotlib 라이브러리를 헤딩 영역에 import 하자.
| 1 | import cv2 import imutils import matplotlib.pyplot as plt |
확대 가능한 웹캠 카메라로 이미지를 촬영하자. 화대 배율 1000X 는 생구라이지만 10x 정도는 잘 찍힌다. 가격은 웹캠 수준이며 사용법 또한 웹캠과 동일하다.

준비한 “harness.jpg” 이미지를 읽어 들인 후 출력하자.
| 2 | image = cv2.imread("harness.jpg") (h, w, d) = image.shape print("width={}, height={}, depth={}".format(w, h, d)) inline_image = cv2.cvtColor(image, cv2.COLOR_BGR2RGB) plt.imshow(inline_image) cv2.waitKey(0) |

입력된 image를 gray 즉 흑백으로 변환하여 출력하자.
GaussianBlur 필터를 사용하여 처리 후 출력하자.
Canny 필터를 적용하여 윤곽선들을 추출해 출력해 보자.
Threshold 처리 후 출력해 보자.
결과물들은 inline 이 아닌 바탕화면에 출력됨에 유의하자.
| 3 | # convert the image to grayscale gray = cv2.cvtColor(image, cv2.COLOR_BGR2GRAY) cv2.imshow('harness',gray) gray = cv2.GaussianBlur(gray, (7,7),cv2.BORDER_DEFAULT) # 커늘 크기를 변경해보자 93,3),(5,5),(7,7) cv2.imshow('Blur', gray) edged = cv2.Canny(gray, 30, 50) cv2.imshow('Edges',edged) thresh = cv2.threshold(gray, 100, 255, cv2.THRESH_BINARY_INV)[1] cv2.imshow('Threshold', thresh) cv2.waitKey(0) |


Threshold 처리된 이미지를 대상으로 findContours 처리하자. 이명령을 적용하면 여러개의 윤곽선이 얻어지게 되므로 그 수를 카운트하여 출력하자.
| 4 | # find contours (i.e., outlines) of the foreground objects in the # thresholded image cnts = cv2.findContours(thresh.copy(), cv2.RETR_EXTERNAL, cv2.CHAIN_APPROX_SIMPLE) cnts = imutils.grab_contours(cnts) output = image.copy() # loop over the contours for c in cnts: # draw each contour on the output image with a 3px thick purple # outline, then display the output contours one at a time cv2.drawContours(output, [c], -1, (240, 0, 159), 3) plt.imshow(output) cv2.waitKey(0) |
최종 출력을 살펴보면 전체적인 윤곽선이 추출되었음을 알 수 있다. GaussianBlur 의 커늘 크기를 조절하면 윤곽선 Object 의 수를 더욱 줄일 수도 있다. 필요한 부분만 추출하려면 다각형 꼬지점들을 설정하여 그 외부를 검은색으로 마스킹하도록 한다.
| 1 | # draw the total number of contours found in purple text = "I found {} objects!".format(len(cnts)) cv2.putText(output, text, (10, 25), cv2.FONT_HERSHEY_SIMPLEX, 0.7, (240, 0, 159), 2) plt.imshow(output) cv2.waitKey(0) |

첨부된 쥬피터 파일과 이미지 파일을 다운받아 같은 폴더에 넣은 후 실행해 보자.
'인공지능 응용 공학' 카테고리의 다른 글
| No validation prediction of unseen image using callback weights (0) | 2023.06.14 |
|---|---|
| Prediction of unseen image using callback weights (0) | 2023.06.11 |
| Keras 학습가중치 callback 업로딩에 의한 이미지 분류 (0) | 2023.06.07 |
| tf.keras.preprocessing.image.ImageDataGenerator 에서 tf.keras.utils.image _dataset_from_directory 로 변경하여 이미지 분류 (0) | 2023.06.07 |
| 학습가중치 저장 및 업로딩에 의한 Keras MNIST 수기문자 판독 (0) | 2023.06.03 |