참조: 구글 Save and load models
https://www.tensorflow.org/tutorials/keras/save_and_load
TensorFlow.Keras 에 의한 MNIST 수기문자 판독 머신러닝 학습과정에서 생성되는 학습 가중치값을 checkpoint 폴더에 저장했다가 다시 불러내서 즉 사전학습시킨 가중치를 활용하는 방법을 살펴보자. 이 기법은 다른 OS 시스템에 porting 을 목적으로 하는 TensorFlow Lite 에서의 기법과는 다른 방법이다. 예를 들면 아나콘다에서 TensorFlow 로 학습 시킨 가중치를 저장해 두었다가 아나콘다 OpenCV 에서 캡춰한 이미지를 대상으로 객체를 탐지해 볼 수 있다.
텐서플로우 케라스를 사용한 MNIST 학습 및 검증 과정에서 model 에서 설정된 신경망 규격에 따라 가중치가 생성된다. 내부적으로 생성된 이 가중치 값들을 model.fit에서 callback 기능에 의해서 출력받아 저장해 두었다가 다시 업로딩해 사용할 수 있으면 컴퓨팅 연산 부담이 큰 학습 과정을 생략하고 직접 테스트 데이터를 시험해 볼 수 있게 된다.
한편 tensorflow_hub 에는 이미 COCO 데이터세트를 비롯한 많은 모델들에 대해서 사전 학습을 시킨 가중치 데이터를 라이브러리 형태로 온라인에서 불러 쓸 수 있도록 제공이 된다.
라이브러리 선언
| 1 | import os import tensorflow as tf from tensorflow import keras import matplotlib.pyplot as plt |
학습용 및 테스트용 튜플 데이터를 준비한다.
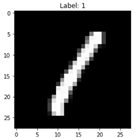
Keras MNIST 데이터 입력 및 이미지 하나를 샘플 출력한다.
| 2 | (train_images, train_labels), (test_images, test_labels) = tf.keras.datasets.mnist.load_data() index = 3 # 샘플 이미지 하나 출력 plt.imshow(train_images[index], cmap='gray') plt.title(f"Label: {train_labels[index]}") plt.show() |
GPU 가 없는 경우 대비 시간 절약을 위해 1000개 이미지 샘플만 선택하여 정규회 하자.
학습 데이터는 60,000 개, 테스트 검증용 데이터는 10,000 개이다.
| 3 | train_labels = train_labels[:60000] test_labels = test_labels[:10000] train_images = train_images[:60000].reshape(-1, 28 * 28) / 255.0 test_images = test_images[:10000].reshape(-1, 28 * 28) / 255.0 |
create_model() 함수 선언, Sequential model 준비, model compile
| 4 | # Define a simple sequential model def create_model(): model = tf.keras.Sequential([ keras.layers.Dense(512, activation='relu', input_shape=(784,)), keras.layers.Dense(128, activation='relu'), keras.layers.Dropout(0.2), keras.layers.Dense(10, activation='softmax') ]) model.compile(optimizer='adam', loss = tf.keras.losses.SparseCategoricalCrossentropy (from_logits = True), metrics=[tf.keras.metrics.SparseCategoricalAccuracy()]) return model |
model 요약 출력
| 5 | # Create a basic model instance model = create_model() # Display the model's architecture model.summary() |
callback checkpoint 설정
| 6 | checkpoint_path = "training_1/cp.ckpt" checkpoint_dir = os.path.dirname(checkpoint_path) print('dir name : ', checkpoint_dir) # Create a callback that saves the model's weights cp_callback = tf.keras.callbacks.ModelCheckpoint(filepath=checkpoint_path, save_weights_only=True, verbose=1) |
model.fit 의 파라메터로 학습 가중치 저장을 위한 callback 이 가능하도록 학습을 시킨다.
| 7 | # Train the model with the new callback model.fit(train_images, train_labels, epochs=5, validation_data=(test_images, test_labels), callbacks=[cp_callback]) # Pass callback to training print(os.listdir(checkpoint_dir)) |
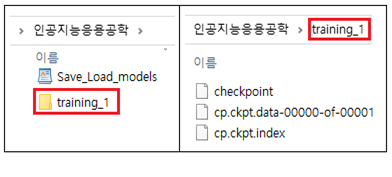
학습 결과 callback 연산에 의해 아래와 같이 training_1 폴더가 생성되어 checkpoint 를 비롯한 데이터 파일들이 생성되어 저장된다.
| 8 | # Create a basic model instance model = create_model() # Evaluate the model loss, acc = model.evaluate(test_images, test_labels, verbose=2) print("Untrained model, accuracy: {:5.2f}%".format(100 * acc)) |
사전학습된 가중치를 업로딩하여 시험데이터 평가에 적용하면 높은 accuracy 를 보여준다.
| 9 | # Loads the weights model.load_weights(checkpoint_path) # Re-evaluate the model loss, acc = model.evaluate(test_images, test_labels, verbose=2) print("Restored model, accuracy: {:5.2f}%".format(100 * acc)) |
즉 사전 학습된 가중치 데이터를 활용하기 위해서는 7번의 학습 코드와 8번의 랜덤 가중치를 이용한 시험평가 단계를 제외시킨 상테에서 training_1 폴더에 이미 저장해둔 학습데이터를 업로딩하여 테스트 데이터를 시험해 볼 수 있게 된다.
개인과제
7번의 model.fit 즉 학습이 이루어지게 되면 Save_Load_models.py 실행파일이 들어 있는 폴더에 trainning_1 폴더가 생성되어 학습 가중치가 저장되게 된다. 따라서 Save_Load_models.py 파일에서 학습관련 코드를 삭제한 후 시험 데이터 평가를 위한 코드로 바꾸되 앞서 저장했던 callback 내용을 업로딩하여 평가하는 코드로 수정하여라. trained_images 자체도 evaluate 을 통해서 거의 1.0 에 가까운 정밀도를 보여주며, 테스트용의 경우는 좀 낮은 98% 정밀도를 보여줌을 재확인하여라.
해답
'인공지능 응용 공학' 카테고리의 다른 글
| Keras 학습가중치 callback 업로딩에 의한 이미지 분류 (0) | 2023.06.07 |
|---|---|
| tf.keras.preprocessing.image.ImageDataGenerator 에서 tf.keras.utils.image _dataset_from_directory 로 변경하여 이미지 분류 (0) | 2023.06.07 |
| 지적재산기반 인공지능응용 공학 목차 PDF 파일 (0) | 2023.03.05 |
| 지적재산기반 인공지능응용 공학 목차 PDF 파일 (0) | 2023.02.22 |
| Attention RNN 모델 (0) | 2023.02.03 |