
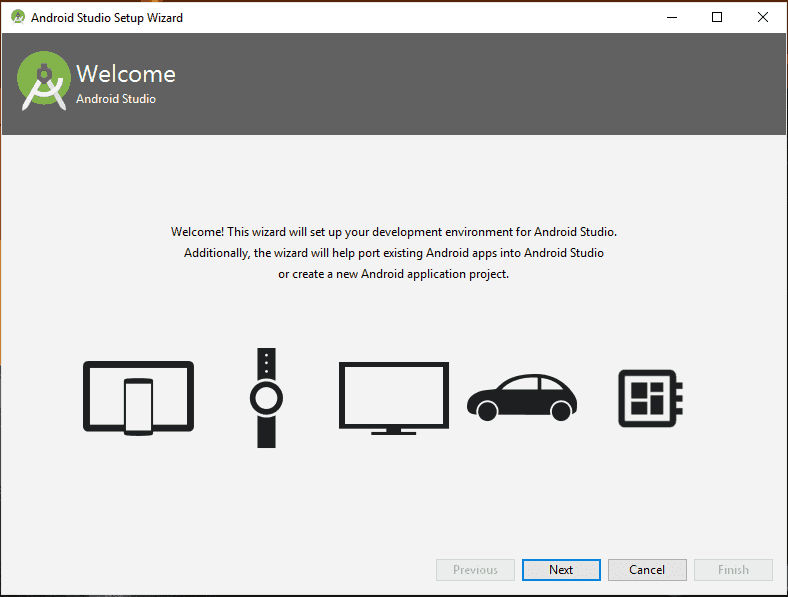
아두이노와 마찬가지로 안드로이드 코드 작성을 위해서도 아두이노와 마찬가지로 IDE(Integrated Development Editor)가 필요하다. 현재 2022년이므로 다음의 URL 주소에서 2021년 범블비 버전을 개발자용 안드로이드 스튜디오를 다운로드 하자.
https://developer.android.com/studio/
Download Android Studio and SDK tools | Android Developers
The official IDE for Android app developers.
developer.android.com
클릭하여 들어가면 아래 사이트가 홀연히 나타난다.
Download options 에는 안드로이드 스튜디오 설치 시스템 별로 실행 .exe 파일이나 압축형 .zip 파일들이 들어 있다. 윈도우즈 경우 예를 들지만 Mac 도 비슷할 것이며 Linux 이 경우는 다들 설치 작업에 이골이 났을터이므로 더 이상 언급하지 않겠다. 윈도즈 사례 참고하여 하면 도움이 될 것이다.
사이트에 들어가보면 실행형 .exe 파일이 바로 타겟이다. 클릭하면 설치작업이 시작되며 동시에 사용자 다운로드 폴더에 실행형 .exe이 저장된다. 실패 시 제어판에서 제거 작업을 하고 C 의 program Files 에서 Android 폴더를 지운 후 다시 시작하면 된다. 만약 압축형 .zip 파일을 다운받으면 사용자가 직접 압축을 해제하고 설치작업을 진행해야 할 것이다.
이번 설치 작업은 다음 url 주소의 영문 내용을 참조하였다.
https://www.tektutorialshub.com/android-studio/how-to-install-android-studio-on-windows/
How to install Android Studio on Windows - TekTutorialsHub
How to install Android Studio on Windows guidel shows you how to download, install & setup Android Studio latest version on the Windows 10 OS.
www.tektutorialshub.com
설치 작업 시작 (Installing Android Studio)
Double click on the downloaded installer to begin the Installation Process.
다운로드 폴더에서 .exe 파일을 중복 클릭하여 설치를 시작한다.
Next 버튼 클릭
After the welcome screen, you will be presented with the option to choose the components. Select both the option and click on Next.
웰컴 스크린 창에 2개의 체크 옵션 창이 뜬다. Android Studio는 현재 설치하고자 하는 오브젝트이며 Android Virtual Device는 안드로이드 스튜디오에서 작성된 코드를 스튜디오 내에서 에뮬레이션(emulation)하기 위해 생성하는 가상 안드로이드 폰을 의미한다. 예를 들자면 애플 아이폰이 없어도 스튜디오 내에서 가상 애플 폰을 사용하면 되는 것이다.
아래 그림과 같이 2개 다 체크한 상태에서 Next 버튼을 클릭한다.
C 드라이브 Program Files에 Android 폴더 명으로 설치한다. 그냥 Next 버튼을 눌러 설치한다.
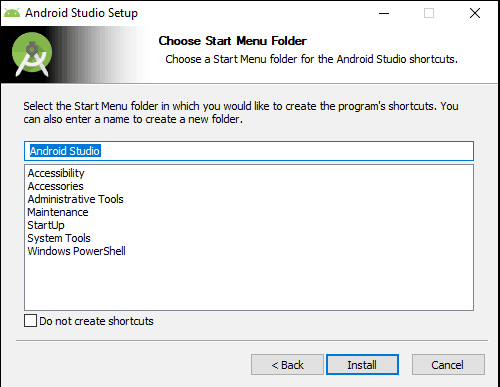
The next window is about selecting the start menu folder. Accept the defaults and click on Install to begin the installation.
시작바에 안드로이드 스튜디오 버튼 설치 작업이다. 그냥 Next 버튼을 클릭한다.
Completing the Android Studio setup screen appears once the installation completes.
안드로이드 스튜디오 setup 이 끝나면 Finish 버튼을 클릭하자. Start Android Studio 체크 박스가 체크 상태이므로 안드로이드 스튜디오 편집기가 스크린에 나타난다.
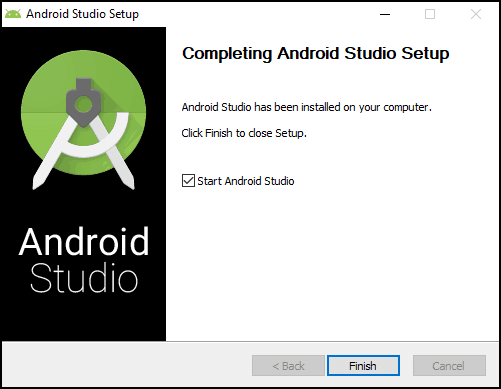
Select the Start Android Studio and Click on Finish. The Android Studio starts for the first time
이미 Finish 버튼을 눌렀으므로 안드로이드 스튜디오가 처음 시작된다.
Setup Android Studio
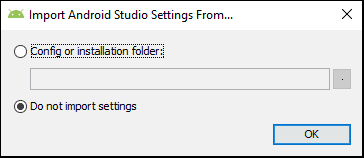
When you start Android Studio for the first time, it will ask you to Import the Studio settings. Since this is a fresh installation choose not to import settings and click on OK.
처음 안드로이드 스튜디오를 시작할때 Studio settings를 import 즉 가져올 것인지 물어 볼 것이다. 이 경우 구버전 사용하다가 신규버전 설치 시는 Configure installation folder 를 클릭하고 아예 처음 설치하는 경우는 가져올 것이 없으므로 Do not import settings 를 체크 하면 된다.
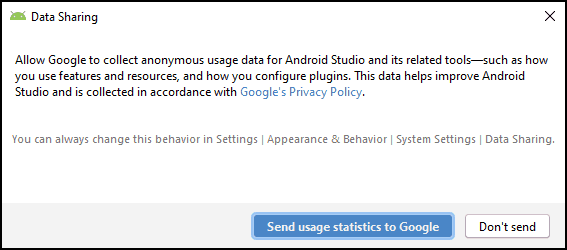
You may be asked to send the usage statistics to Google. choose accordingly.
사용 통계 메세지를 구글에 보낼 것인지 물어 보면 Send usage statistics to Google 버튼을 클릭한다.
The Android Studio will download a few components and then displays the Android Studio Setup Wizard dialogue box as shown below. Click Next to continue.
안드로이드 스튜디오는 몇 개의 구성ㅍㅁ을 다운로드하게 될 것이며 아울러 아래 그림에서 처럼 안드로이드 스튜디오 셋업 위저드가 디스플레이 되면 Next 를 클릭하자.
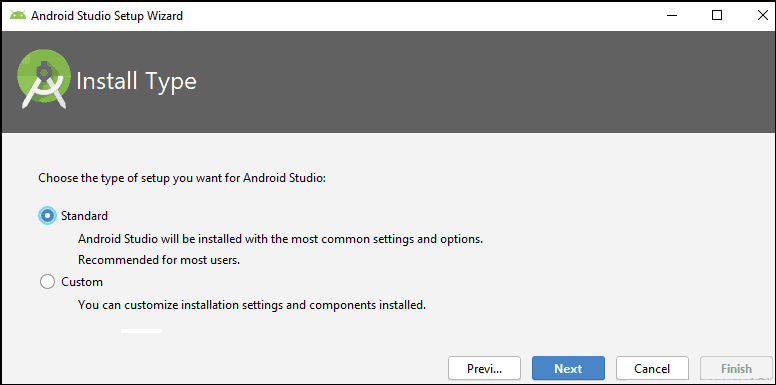
The second dialogue box asks for the install type. Select the default i.e. Standard and click on next to continue to next window.
설치 유형은 표준(Standard)형으로 선택하고 Next 버튼을 클릭하자.
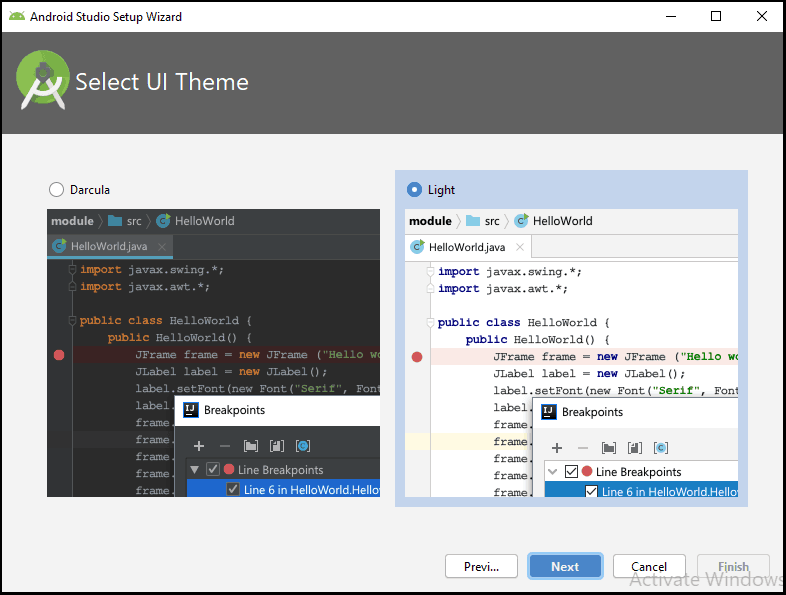
The next up is the select UI Theme screen with two options Light & Darcula. Let us keep the default Light theme.
편집기 화면 배경색을 Dark 나 밝은색 중 하나를 선택하고 Next 버튼을 클릭하자.
Finally, the Verify Settings dialogue appears, where you can verify the settings here. Click on Previous if you want to change any of the settings else click on finish to complete the installation.
마지막으로 검증세팅 다이아로그 박스가 나타나면 살펴보고 잘못된 항이 있으면 아전(Previous)버튼을 사용하여 돌아가서 수정하도록 하며 이상이 없다면 Finish 버튼을 클릭한다.

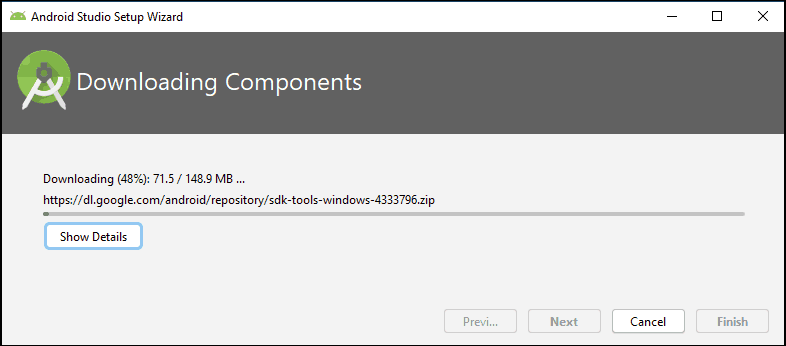
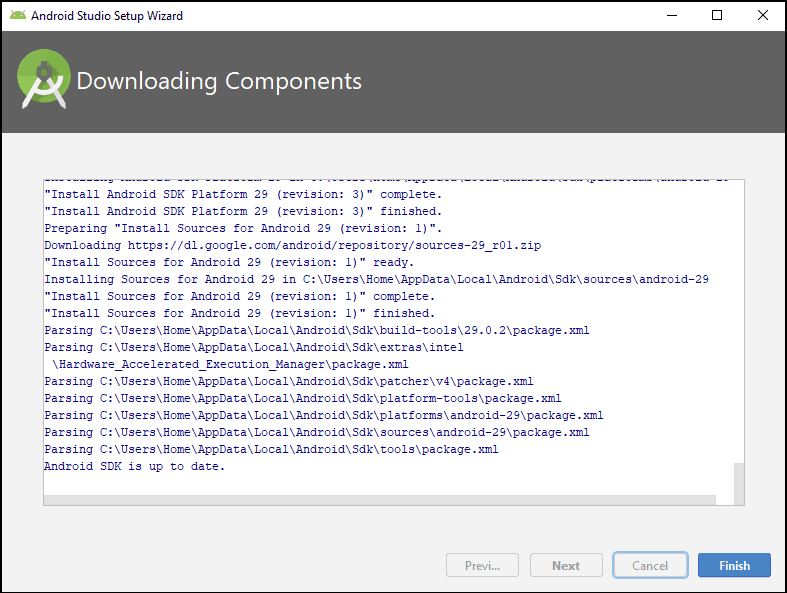
Now, the Android Studio setup wizard starts to download the various components and installs them in the system. This will take time depending on your internet connection.
자 그러면 안드로이드 스튜디오 셋업 위저드는 다양한 구성품들을 다운로드를 시작하며 그것들을 시스템에 설치한다. 이러한 작업은 인터넷이 연결돈 상태에서 시간을 조금 잡아 먹는다.
You may see HAXM Installation Failed error here. It will happen under the following circumstances
- If the processor is non-intel based.
- If you have not disabled the Hyper-V Manager
Ignore them for now and continue.
If you are on intel based CPU, then HAXM is very important. without which Android Virtual Device (AVD) runs very very slowly.
The following screen appears once all the essential components are downloaded and installed. At this point the Android Studio installation is complete.
안드로이드 스튜디오 설치가 완료되면 다음과 같은 결과 창을 볼 수 있다.
Starting Android Studio
Once the installation and initial setup is complete, the Android Studio starts. Since it is the first time you are starting the Android Studio, it will be present you with the Welcome to Android Studio screen as shown below
아래와 같이 스크린 화면이 나타난다. 새로이 안드로이드 코드 작성을 시작할 것인지 또는 기존의 샘플 코드 파일이 있으면 열어보든지 선택하자. 처음 설치하시는 분이라면 New Project 을 선택하고 아래에 이어서 기술된 Open 을 선택했을 경우 사례를 건너뛰도록 한다.
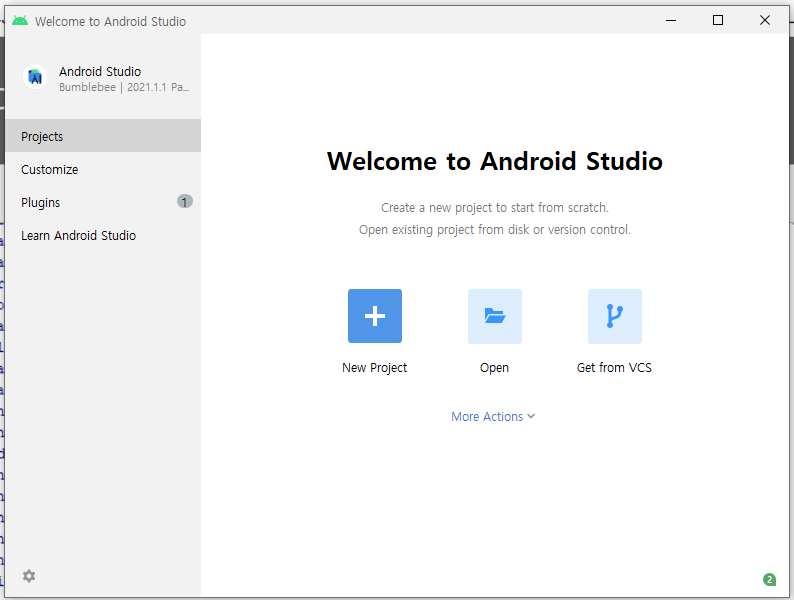
Usually, Android Studio automatically opens the last Opened Project. But since it is a new Android Studio installation it will not open until you create a new project or open an existing one. Hence we will create a new project. Click on Start a new Android Studio Project.
보통 안드로이드 스튜디오 설치 후 샘플 코드를 아래와 같이 여기서는 바탕 화면의 개인 사용자 폴더 SC (참고로 C 드라이브의 사용자 폴더 아래에 개인사용자 폴더 SC가 위치함) 밑에 AndroidProjects 라는 폴더를 만들어 저장하였고 그 안에 포함된 카메라 앱을 한번 오픈 시도하였다. 이 부분은 그냥 본 후에 건너뛰어 새 프로젝트 작성으로 넘어가기 바란다.
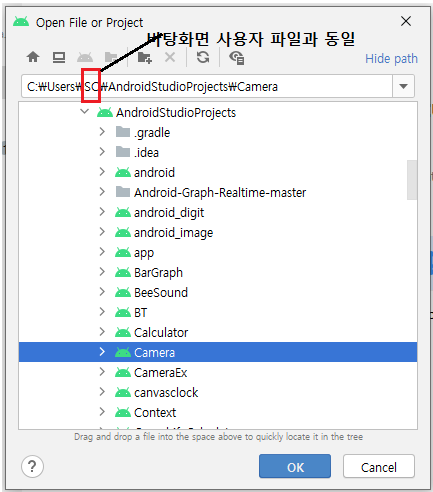
구버전에서 작성했던 안드로이드 스튜디오 앱 파일들이 있어 옮겨와서 한번 열어 보니 상당히 많은 분량의 구성품들 업그레이드와 아울러 특히 모델 빌드를 위한 gradle 시스템의 업그레이드 작업이 이루어저 아래 사례와 같이 같이 복구가 되긴 하였다. 만약 처음 안드로이드 스튜디오 설치자라면 이와같이 Open 을 클릭하지 말고 New Project 를 클릭하여 다음 과정으로 넘어가기 바란다.
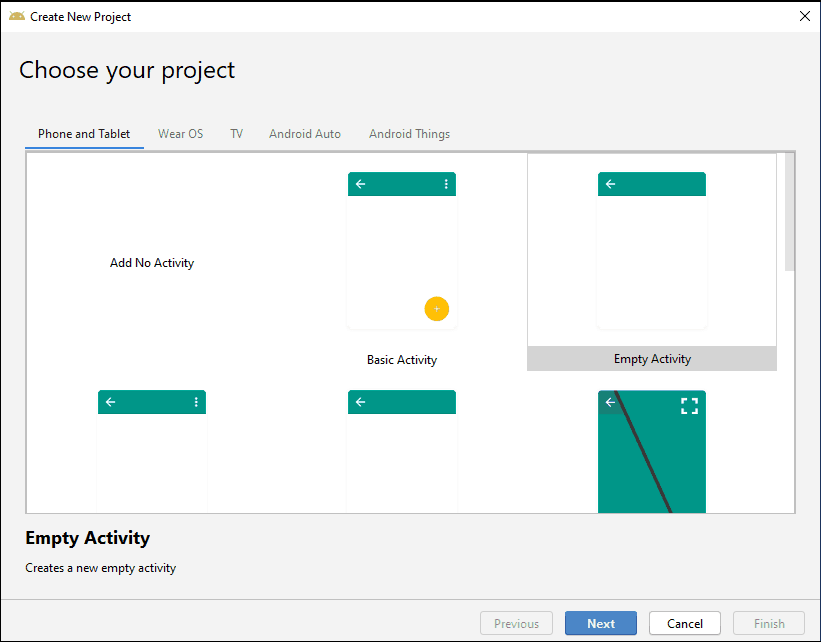
The Create New Project appears. The first option is to select the type of activity. Choose Empty, which is the default and click Next.
Create New Project 창이 나타나면 Empty activity 유형을 디폴(트)로 선택 후 Next 버튼을 클릭하자. 이러한 템플레이트 선정이 안드로이드 스튜디오 코득 작성과 연관하여 대단히 중요하다는 점을 지적해둔다. 즉 이미 코드 작업이 시작된 것이다.
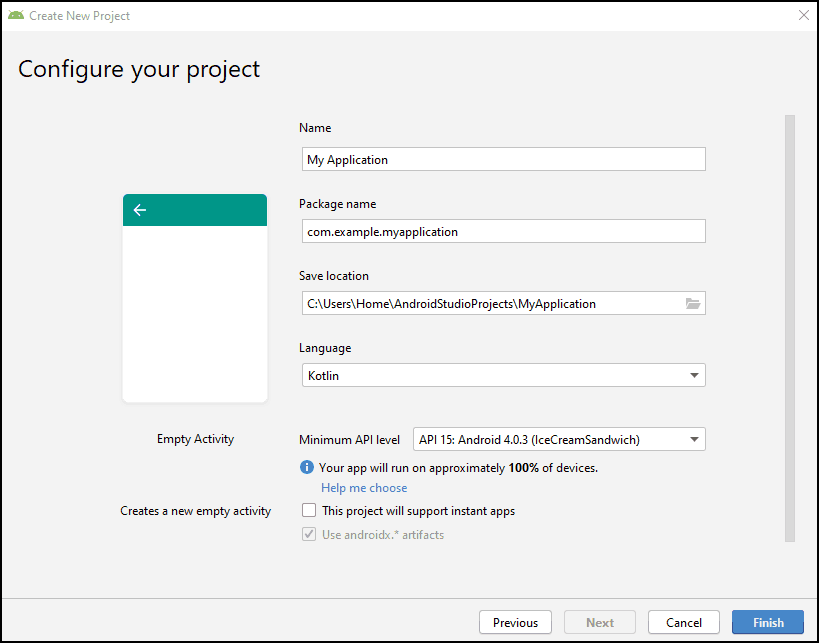
Configure your project is the next screen. It will ask for the name of the Application, Package Name, Project path, language, and API Level. Keep the defaults and click on Finish.
여기서부터 프로젝트 명을 기입하고 미리 준비해둔 코드 저장소 경로를 입력 후 Java 나 Kotlin 중 에 하나 Language 버전을 선택하도록 한다. 구글서 나온 Kotlin 의 성능이 좋다고는 하지만 처음 배우시는 분들에게는 예제가 필요한데 대부분이 거의 자바 버전이다. 처음 배우시는 분들은 자바인지 코틀린인지 그다지 중요치 않다는 점에 유의하자. 아울러 이 창에서 입력항들이 안드로이드 코드 스트럭쳐를 반영하고 있다는 점이다.
파일명을 설정하면 자동적으로 package name 이 처리되어 내부 코드에 반영되어 나타난다.
Finish 버튼을 클릭한다.
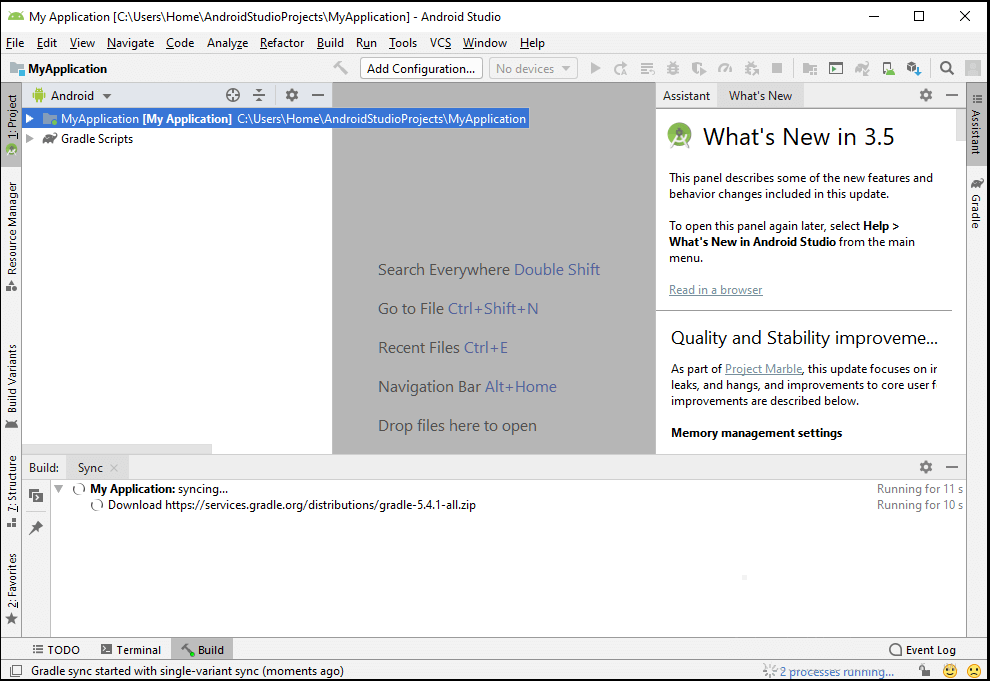
Android Studio may start a few more downloads. Wait for it to finish. Once everything is downloaded and installed, the new project is created and you are taken to the Android workspace.
새 프로젝트를 여는 과정에서 안드로이드 스튜디오는 몇가지를 더 다운로드한다. 끝날때까지 기다리면 새 프로젝트가 형성되는 것이며 드디어 당신은 안드로이드 공간에 들어서게 된 것입니다.
Now, you have completed all the installation steps and Android Studio is now ready to use
자 이제는 어떤 코드를 작성해야 할지 고민해야 할 시점입니다. 안드로이드는 동시에 여러 개의 연동된 창들을 체계적으로 오가야 하기때문에 첫발을 디디기가 쉽지 않을 수도 있습니다. 입문용으로 아주 적절한 예제를 찾아 봐야 할 것입니다.
설사 첫 예제를 성공한다고 해서 코드 구조의 완전한 이해 기준 50% 이상이면 괜찮다고 봐야 합니다. 이어지는 여러 개의 프로젝트들을 소화해야 조금 어느정도 이해가 되기 시작할 것입니다.
다음 편부터는 안드로이드 스튜디오 처음 하시는 분들에게 적절한 코드 사례를 소개할 예정입니다.
'안드로이드 스튜디오' 카테고리의 다른 글
| 초보자를 위한 첫 Hello World! 코딩 안드로이드 스튜디오 (0) | 2022.05.01 |
|---|---|
| 유튜브: 안드로이드 스튜디오 코딩 나도 배울 수 있을까요? (0) | 2022.04.15 |
| 안드로이드 스튜디오 CameraEX 코드 구조 (0) | 2021.12.19 |
| 2021년 12월 코딩 아트 베스트 블로그 (0) | 2021.07.12 |
| 6.3 가속도센서 Shake Color Change 안드로이드 스마트폰 프로젝트 (0) | 2020.05.30 |